This article will show you how to add routes to your Node.js/MySQL API using the POST method. These routes will allow you to create and insert data into your database-related tables using Sequelize ORM.
In the following examples, we have two models Employee and Company, and they are related by a One-To-Many association which means a company could have many employees. An employee can work for only one company at the same time.
We are adding our routes to the Node.js/MySQL API implemented in this previous article: ONE-TO-MANY Association in MYSQL Database using Sequelize async/await with Node.js, and we define these routes to insert data to the Employees and Companies tables.
- The Sequelize Models in our API
- Create the Controllers using Sequelize async/await in node.js
- Controller for creating an employee
- Controller for creating a Company
- Adding the POST Routes using Sequelize async/await calls
- POST employee Route
- POST company Route
- Testing our POST routes with Postman
- Conclusion
- You might also like:
The Sequelize Models in our API
employee.js
const { Sequelize, DataTypes } = require("sequelize");

const db = require('../db.js');


const  sequelize = db.sequelize;

const Employee = sequelize.define("Employee", {

 id: {

   type: DataTypes.INTEGER,
   autoIncrement: true,
   allowNull: false,
   primaryKey: true,

 },

 name: {

   type: DataTypes.STRING,
   allowNull: false,

 },
position: {

   type: DataTypes.STRING,
   allowNull: false,

 },

 email: {

   type: DataTypes.STRING,
   allowNull: false,

 },
wage: {

   type: DataTypes.INTEGER,
   allowNull: false,

 },

});


module.exports = Employee;
company.js
const { Sequelize, DataTypes } = require("sequelize");

const db = require('../db.js');


const  sequelize = db.sequelize;

const Company = sequelize.define("Company", {

 id: {

   type: DataTypes.INTEGER,
   autoIncrement: true,
   allowNull: false,
   primaryKey: true,

 },

 name: {

   type: DataTypes.STRING,
   allowNull: false,

 }


});


module.exports = Company;
Create the Controllers using Sequelize async/await in node.js
We add our controllers to the file named controller.js, and we will define them as async functions. Then, we will export these functions in order to call them in our routers.
Controller for creating an employee
To create and add an employee to the Employees table, we use create() method on the Employee Model, and we pass to it a parameters object which contains the name, position, email, and wage of the new employee.
async function  insertEmployee(name, position, email, wage) {

  await Employee.create({name, position, email, wage});

}
Controller for creating a Company
We do the same to insert a company to the Companies table, we use the create() method on the Company Model, and we pass to it a parameters object which contains the name of the new company.
async function  insertCompany(name) {

  await Company.create({name});

}
So our controller.js file will look like this:
controller.js
const db = require('./db');

const Employee = db.Employee;
const Company = db.Company;
 module.exports ={

  getAllCompaniesEmployees,
   getOneCompanyEmployees,
   insertEmployee,
   insertCompany

 };


  async function getOneCompanyEmployees(id) {

  const company = await Company.findByPk(id, { include: [Employee] });

   return company;


  }


 async function getAllCompaniesEmployees() {

  const companies = await Company.findAll({ include: [Employee] });

   return companies;


  }


async function  insertEmployee(name, position, email, wage) {

  await Employee.create({name, position, email, wage});

}


async function  insertCompany(name) {

  await Company.create({name});

}
Adding the POST Routes using Sequelize async/await calls
After defining and exporting the two new controller functions, we will use them in our routes, and we will do that in the file named apiRouter.js inside our project directory. The apiRouter is the starting point for all API routes.
Before adding the POST routes to your apiRouter.js, first, you need to pull in the async functions from controller.js by adding this line of code to your apiRouter.js.
const {getAllCompaniesEmployees, getOneCompanyEmployees, insertEmployee, insertCompany }= require('./controller.js');
POST employee Route
First, we need to get all the employee information from the request object then verify if they are not null; We call the insertEmployee() function with the present data to add the new employee to the Employees table and send back a successful message. In case one of the fields is null, we throw an error.
 // Create an employee

apiRouter.post('/employee',  async (req, res, next)=>{
    try{
        const name = req.body.employee.name;
        const position = req.body.employee.position;
        const email = req.body.employee.email;
        const wage = req.body.employee.wage;
        console.log(name);
              if (!name || !position || !wage) {
                return res.sendStatus(400);
             }

        const employee =  await insertEmployee(name, position, email, wage).then(() => res.json({ message: 'Employee created.' }));


    } catch(e){
        console.log(e);
        res.sendStatus(400);
    }
 });
POST company Route
We do the same here; first, we get the company name from the request object then verify if it is not null; we call the insertCompany() function with the name to create a new company send back a successful message. If the name field is null, we throw an error.
 // Create a company

apiRouter.post('/company',  async (req, res, next)=>{
    try{
        const name = req.body.company.name;

        console.log(name);
              if (!name) {
                return res.sendStatus(400);
             }

        const company =  await insertCompany(name).then(() => res.json({ message: 'Company created.' }));


    } catch(e){
        console.log(e);
        res.sendStatus(400);
    }
 });
apiRouter.js
 //apiRouter.js

const express =require('express');
const apiRouter = express.Router();
const  {getAllCompaniesEmployees, getOneCompanyEmployees, insertEmployee,
    insertCompany }= require('./controller.js');


  // Get all companies with employees

apiRouter.get('/company', async (req, res, next)=>{
   try {
       const companies = await getAllCompaniesEmployees();
       res.status(200).json({ companies: companies});
   } catch(e) {
       console.log(e);
       res.sendStatus(500);
   }
});

apiRouter.param('companyId', async (req, res, next, companyId)=> {
   try{
       const company = await getOneCompanyEmployees(companyId);
       req.company = company;
       next(); // go to apiRouter.get('/:companyId')
   } catch(e) {
       console.log(e);
       res.sendStatus(404);
   }
});


// Get company with its employees

apiRouter.get('/company/:companyId',  (req, res, next)=>{
   res.status(200).json({company: req.company});
});


// Create an employee

apiRouter.post('/employee',  async (req, res, next)=>{
    try{
        const name = req.body.employee.name;
        const position = req.body.employee.position;
        const email = req.body.employee.email;
        const wage = req.body.employee.wage;
        console.log(name);
              if (!name || !position || !wage) {
                return res.sendStatus(400);
             }

        const employee =  await insertEmployee(name, position, email, wage).then(() => res.json({ message: 'Employee created.' }));


    } catch(e){
        console.log(e);
        res.sendStatus(400);
    }
 });


 // Create a company

apiRouter.post('/company',  async (req, res, next)=>{
    try{
        const name = req.body.company.name;

        console.log(name);
              if (!name) {
                return res.sendStatus(400);
             }

        const company =  await insertCompany(name).then(() => res.json({ message: 'Company created.' }));


    } catch(e){
        console.log(e);
        res.sendStatus(400);
    }
 });


module.exports = apiRouter;
Testing our POST routes with Postman
Before you start testing the API with Postman, you need first to start your node.js app.
1. Create an employee
To create and insert an employee to the Employees table, use the following setting in your Postman:
- Path: apiRouter/employee
- Method: POST
- URL: http://localhost:3000/apiRouter/employee
- Change the body type to “raw”
- Change the format to “JSON”
- The json object: {“employee” : {“name”: “employee1″,”position”: “manager”,”email”: “[email protected]”,”wage” : 6000,”companyId”: 1}}
- Click Send.

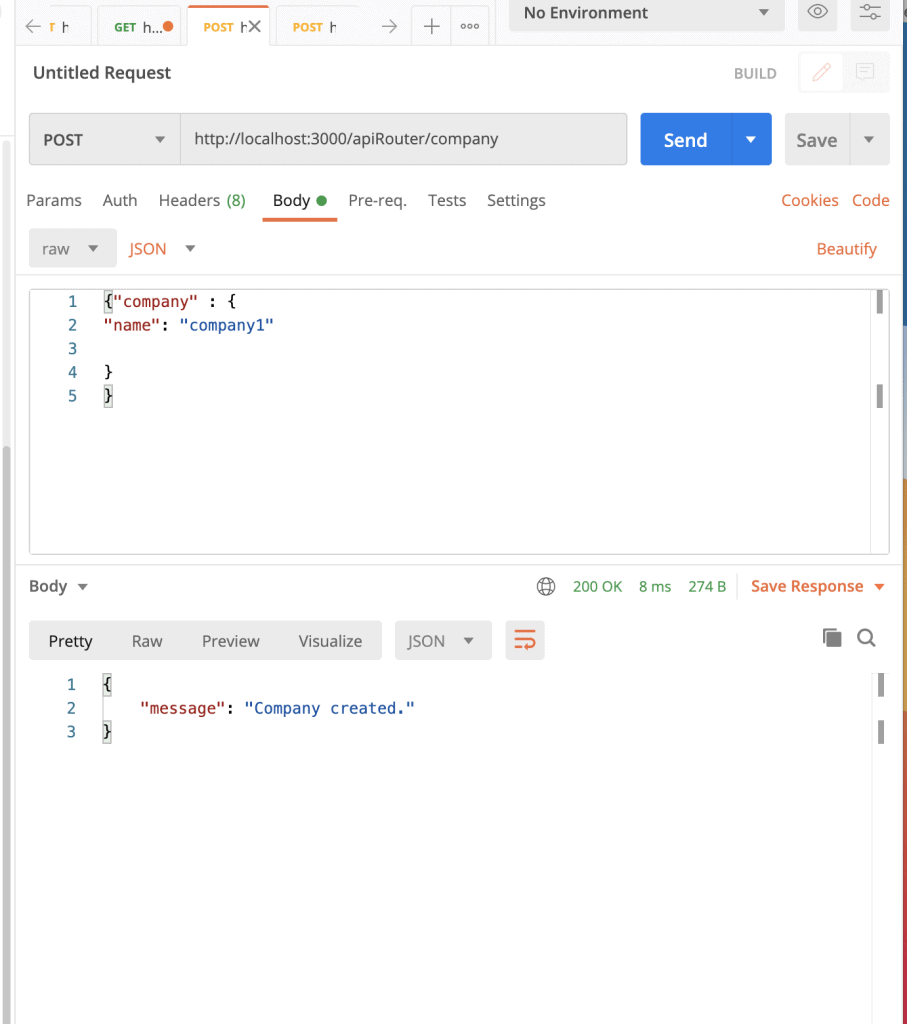
1. Create a company
To create and insert a company to the Companies table, use the following setting in your Postman:
- Path: apiRouter/company
- Method: POST
- URL: http://localhost:3000/apiRouter/company
- Change the body type to “raw”
- Change the format to “JSON”
- The json object: {“company” : {“name”: “company1”}}.
- Click Send.
Conclusion
In this post, we’ve learned how to add routes to a node.js/ MySQL API to create and insert data into our database-related tables. I hope this was helpful for you. This article is part of a previous post dedicated to the one-to-many Sequelize association. To understand the overall architecture of the application and see a complete version of the API, please check this article: ONE-TO-MANY Association in MYSQL Database using Sequelize async/await with Node.js .
To see the rest of the CRUD API and how to write the controller using Sequelize async/await, read this article: How to use Sequelize async/await to interact with MySQL database in Node.js.
To implement your API using the initialize() function to connect MySQL server, connect a database with Sequelize ORM, and initialize the models, go here: Example How to use initialize() Function in Node.js/Express API.
You might also like:
ONE-TO-MANY Association in MYSQL Database using Sequelize async/await with Node.js.
Example How to use initialize() Function in Node.js/Express API .
How to use Sequelize async/await to interact with MySQL database in Node.js.
How to interact with MySQL database using async/await promises in node.js ?
How to Build a Complete API for User Login and Authentication using MySQL and Node.js.
Why is Connection Pooling better than Single Connection?.
How to create MySQL database using node.js.
How to store Session in MySQL Database using express-mysql-session.
How to Manage Session in Nodejs using Redis Store.
Complete Guide to Build a RESTful API with Node.js and Express.
Node.js + Redis – Complete API for Authentication, Registration and User Management.